Welcome!

Welcome! So glad you stopped by my little bit of blogdom. Here I share my hobbies of nail polish, nail art and glue-on nails.


Friday, April 29, 2011

Marshalls Scrapbooking Haul

Last week I stopped in at Marshalls and found all these great scrapbooking items.
  • Mango Frost 12x12, 48 pages $19.00  ...................I paid $5.99
  • Animal Crackers 8x8, 48 pages $7.00  .............................$3.99
  • Mi Casa 12x12, 48 pages $19.00          .............................$5.99
  • Mango Frost 8x8, 48 pages $7.00        ..............................$3.99
  • Hippie Chic 12x12, 48 pages $19.00    ..............................$5.99
  • Journal, dragonfly designs, $14.95       ..............................$3.99
  • Me & My Big Ideas Chipboard album kit $7.69 ...............$3.99
Totals                                                          $93.64    I paid $33.93

Marshalls' rocks!

Thursday, April 28, 2011

Hammered Nails/Steampunk Inspired Take 2

So this was my second attempt at trying a steampunk inspired design. I used the same colors as the first attempt, but with a difference. This time I let each sponged on layer dry before applying the next layer. I also painted the Nailene fake nails, on my non-sticky-sticky-non-sticky ,black as the base first.


I like how these turned out as well. There is more gold/bronze color in the center.

Wednesday, April 27, 2011

Caribbean Beach Look 1

As my nails continue to grow, I have to keep them polished to protect them from my nail biting ways. They are thin and split at times without help.

I've got 3 coats of Sally Hansen Hard As Nails basecoat on, and then these polishes...

  • Wet-n-Wild Wild Shine #468 Metallica
  • Sinful Colors #79 Opal Glitter (clear glitter)
  • Wet-n-Wild #446C Caribbean Frost
  • Confetti #083 Party Palace Blue (blue glitter)

2 coats of Caribbean Frost, 2 coats of Metallica, followed by 1 coat of Palace Blue over the Caribbean Frost, and 1 coat of Opal Glitter over the Metallica.

Tuesday, April 26, 2011

Hammered nails/steampunk inspired

This was my first attempt to sponge paint polish on glue-on nails. I tried to mimic a steampunk inspired look.

 Polishes I sponged:
Wet-n-Wild
  • 238 Nocturnal
  • 232 Goldmine
  • 233 Rustic
  • OPI Concerto in Copper
I cut up a couple of make up sponges, and poured out little portions of polish into an old ceramic skillet I no longer use for cooking.

I laid out the Nailene full cover short square nails I would use on this, my non-sticky-sticky-non-sticky


I used a Kiss Nail Art Stencil on one nail.  I sponged on the next color before the first polish was not fully dry. The next day, when all the polishes were dry, I coated each nail with clear top coat.

Monday, April 25, 2011

After glue on full cover nail removal

I know that probably the best way to remove glue on full cover nails is to use pure acetone and soak the nails off. I've done this and it leaves me with very damaged cuticles and dried out skin for a long time after. It takes many days for my cuticles to stop cracking and tearing and becoming infected.

Now truth be known, I stopped biting my nails 2 weeks ago after years of biting them. I tend to care more about my cuticles and skin than the shape of my nails because I wear full cover glue on nails and they cover my sin.

I wait until the nails are lifting, when I know the glue is "cured" and not holding all of the fake nails on my nails. and then I use a toe nail clipper to lift the glue on nails from my finger nails. I'm very careful to work the fake nail off slowly, to avoid pulling off bits of my own nail. I don't recommend doing this, it's just what works best for me.

As you can see, they look pretty rough.


My nail mending arsenal:
  • Pure Acetone ($3 @ Target)
  • H2O Spa Hand and Cuticle Scrub ($4 in a 5 piece gift set @ Marshalls)
  • Sally Hansen Hard As Nails  (It's actually clear) (75% off clearance sale @ CVS)
  • Barielle Intensive Nail Renewal Oil ($3.99 @ Marshalls)
  • J.R. Watkins Natural Apothecary Hand & Cuticle Salve ($6.27 on clearance @ Target)
  • Crabtree & Evelyn Hand Therapy ($5 sale in store)
I listed all the prices to show that taking care of your nails doesn't have to be expensive if you look for sales and bargains. I tried H2O brand when I read about it on a blog. I love this brand now and find it on discount at Marshalls. The gift set that has the hand and cuticle scrub comes with foot scrub, hand cream, foot lotion, and a pumice brick. It was only $20. The cuticle scrub is awesome, as is the foot scrub.

After the fake nails are off, I gently buff off some of the residual glue with the nail file, use pure acetone to remove more glue, and then wash with cuticle and hand exfoliating wash to get even more glue off.  Then after my nails are dry I polish them with nail hardener, and then cuticle oil. Before bed, I'll rub cuticle cream into my cuticles and put on the hand lotion.


They don't look too bad now. As you can see, my nails are really thin, almost transparent. But they are growing! Tomorrow, I'll apply another coat or 2 of the nail hardener, and then I'll polish them with color.

Kiss Everlasting French Tip Nails: Update

NEW KISS EVERLASTING FRENCH TIP NAILS REVIEW CLICK HERE

Here's how the nails looked this Monday morning.
The ends of the nails, near the cuticles, on my middle and ring finger were looking kind of rough. I took the blue side of the nail file that's included in the nail kit and filed the rough edges. I figured, what could it hurt? Afterward, I rubbed cuticle cream into all my cuticles.


 You can see the white spot on my ring finger and thumb. Those are dried glue air bubbles.
I wore them outside today but the problem I'm having tonight is water under some of the nails from simple hand washing and showering.  I don't want to develop fungus under my nails so they're coming off tonight.

So for me, they lasted 4 days.

Saturday, April 23, 2011

Kiss Everlasting French Tips Real Short Square Shape Nails Review

UPDATE: NEW KISS EVERLASTING NAILS REVIEW CLICK HERE
 
I put these on Friday evening. It took about 15 minutes. The Self-Tabs make holding and gluing the nails on very easy.


I used the pink gel glue that comes with the kit, along with the orange cuticle stick and 2-sided nail file.

First I cleaned my nails with polish remover, and washed my hands with exfoliating hand scrub.
Usually, I would roughen up my nails with the blue side of the nail file, but this time I let them alone.

After selecting the nails that fit my natural nails, (and this kit had many sizes I hadn't seen previously in other kits), I applied a bit of glue to the left pinky glue on nail and then some glue to my natural nail.

Instead of pressing down on the glue on nail, I did something different, that I had read or watched on youtube. Can't remember exactly where I got this tip. Instead of pressing I just let the nail float on top of my natural nail, glue to glue, so to speak. When the nail was secure, I applied the rest of the nails in the same manner.

Near the end, I put on the thumb nails, then the right pointer finger and lastly, the left pointer finger. It just seems the easiest way for me. I also lightly twist/snap off the tabs at the end of the nails once glued, so I can grasp the next nail that needs to be glued.

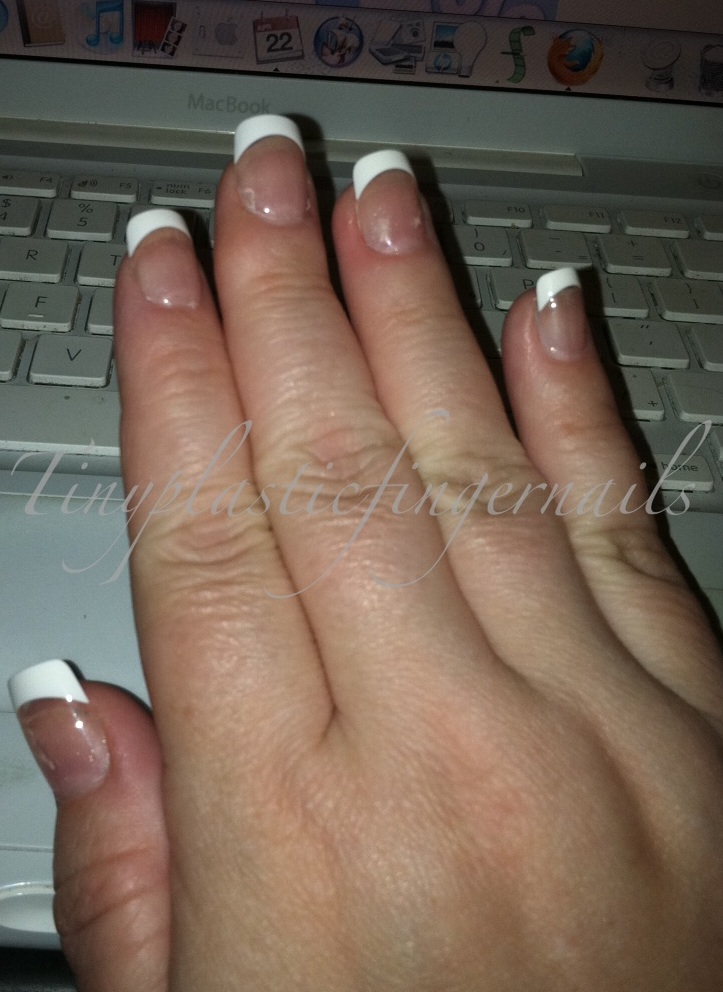
Here's what my nails looked like last night, with flash.

You can see the white areas around my middle finger and ring finger where the glue had seeped out and dried. 

Right hand with flash. The much loathed air bubbles showed up on my ring finger. Blast! I did pressed down on the ring fingers after I saw there were air bubbles. I really didn't think it would help, after the glue dried a bit, but I gave it a shot.

Last night, before bed, I gently filed off the white bits with the blue side of the nail file that is included with the kit. Then I rubbed cuticle cream around all the nails, and put on hand cream.

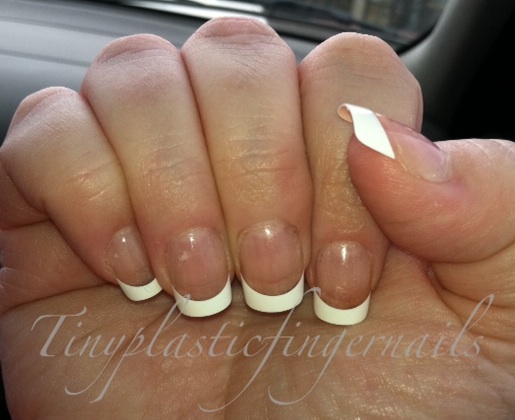
Here's what the nails looked like today, in natural light.


The glaring dried white glue bits around the nails are gone, and the air bubble on the left ring finger is very minimal now.

Conclusion:
I really like these nails.  They fit my rather short nail beds pretty well, both in length and width. Probably because there were more sizes to choose from, I was actually able to custom fit every nail. I believe my left hand pointer finger was a 10 (a size I've never seen before), and my right was a 7.

It seems that the nail glue in this kit is "different" or a new formula because it looked and felt different and the air bubbles were minimal compared to other nail glue in the Kiss and Broadway kits I've used. One exception was the glue in the Kiss Salon UV Gel Effect glue on nails kit. That had a different consistency as well that made the nails look more professionally done.

I haven't felt the need to disguise the air bubbles with glitter nail polish because they are minute.

I bought these at Target. Cost $5.99 for 28 nails.  I will definitely buy these again.
Have you tried these nails? What was your experience? Please post a comment below. 
Are you thinking about trying them? If so, I want to encourage you to get a box and try them out. Then come back here and let me know how you liked or disliked them.  

I'd love to hear from you!

Friday, April 22, 2011

Big Lots Haul

I read on novuveaucheap that Big Lots had some really great beauty bargains. Sceptically, I went tonight to see if we had anything CA might have. Here's what I found:

  • Ecotools by Alicia Silverstone (cosmetic case/one ecotool blush brush) $3.50 
  • Ms Pedicure toe separators (2) .50¢ 
  • Ms Manicure Diamond Dust Nail File (Precision filing tool) $1.00
  • elf (2004 Nouveau Neutrals) $1.00
  • elf (2008 Ivy) $1.00
  • Swissco Wooden Natural Bristle Nail Brush $1.50
  • happy pear (29 pieces) chipboard stickers $1.50
  • Swissco 7-way Nail Buffer $1.00
  • L.A. Colors Nail Art Deco (Intense Pink) $1.00
  • Revlon Nail Enamel (916 Chocolate Truffle, 250 Pink Freeze) $2.00
  • Ms Manicure Deluxe Point Tip Tweezers (best tweezers in the world, imho) $1.50
  • Expressions Classic 500 Rubberbands $1.00
  • Goody Ouchless ponytail holders (Starry Nights Colors) $1.00
  • Cotton™Cotton Balls, Pads & Swabs (in handy plastic case) $1.50
All good buys but I'm especially excited to find the Ms Manicure tweezers. Mine came to an unfortunate demise and I could never find them until now.

Sunday, April 17, 2011

Nail wraps: Sally Hansen vs Broadway review

Sally Hansen nail wraps (paid for by me)
I put these Houndstooth pattern wraps over pre-polished Fing'rs artificial nails. I didn't cover my ring finger, and kept it with the floral sticker. There are only 16 nail wraps in the Sally Hansen box. Only enough for one manicure.

Each nail wrap is individually sealed. They are fairly easy to position and maneuver over the nail.  the only difficulty I had was determining which wrap was big enough to cover the nails. I ended up spliced some excess wrap onto the sides of the nails that weren't covered completely. I used the excess from the top of the wraps to do this. Theoretically, I should have enough to do another manicure.

These wraps lasted about 3 days, when it was time for me to remove the artificial glue on nails.

Broadway nail wraps
These were sent to me for review as I am a 2011 Broadway Brand Beauty Ambassador.  There are enough wraps (28 wraps) in the box to do at least 2 manicures.  I'm not sure if it was due to the fact this was my first time around a nail wrap but I had many problems with these.

I again had trouble sizing up the wrap to fit the fake nail. Here I'm wearing Nailene Active Square glue on nails. The wraps are stuck to a card insert. Some of the wraps tore as I was placing them on the nails. I had to do patch work with the excess wrap ends. After getting the wraps in place, I covered them with clear glitter top coat. These wraps lasted through the weekend but were peeling in places, probably because of the patch jobs.

Conclusion
Sally Hansen nail wraps seemed to be the easier of the 2 but they still gave me problems. They are more expensive than Broadway nail dress wraps, and have less product in the package.

Broadway Nail Dress Wraps are just around $5.99 per package. They are thinner and tear more easily than Sally Hansen did. However there are more wraps in the package, so redoing a nail would be easier on the budget.

I'm not really sure I'll ever buy any more Sally Hansen wraps unless they are half-off or on clearance. They are around $10 and just not worth it at the price to me. 

I have one more package of each and will give it another go one day and post my thoughts. 

How I handle air bubbles

As I've mentioned before, I have flat nail beds. Most glue on nails are arched. I adore french tip nails but because of my flat nail beds, they don't always sit snug against my nails.
I end up with air bubbles.


I tried to capture the air bubble under my middle fingernail in this photo.  Even though air bubbles don't always pick up in pictures, they are there in real life and I can't stand it.

What I do is disguise air bubbles with lightly tinted glitter nail polish.


This is a very subtle way to hide air bubbles, and add a bit of pizazz to plain white french tip glue on nails. The french tips have a blue tinge to them now.

Friday, April 15, 2011

Minnie Mouse inspired nails


In the photo above, I am showing the nail art I wore for a trip to Florida.  After scouring the video webs for ideas, I came up with my own version.
What you'll need:


And a q-tip with an end snipped off for a dotting tool if you don't have a dotting tool.  The red polish is Wet-n-Wild Wet Shine "Red Rouge." Any fast drying top coat will do. Have something to pour some of the white nail paint into, like a pallet. I use a small, old ceramic pan we no longer use.
 This comes in handy too:


This is another video web discovery. It's a lid from a small box. I call it "Non-sticky-sticky-non-sticky." I take a strip of duct tape and put it on the box, in the middle, sticky side up. Turn the ends and secure underneath the lid. Then take another strip of duct tape, and cut it down the center, lengthwise. Each sticky piece goes on either side of the middle piece, sticky side down.
So that's:

  1. Non sticky
  2. Sticky
  3. Non sticky
I can't paint very well with my left hand on my right hand nails. This little lid is a handy way for me to paint the full cover nail blanks, before I glue them on my nails. I can paint about 3 or 4 times on this before I have to change the tape.

Minnie Mouse Inspired Nails:

  • Select 10 full cover nails that fit your nails. Press into sticky strip on sticky lid.
  • Paint nails red. Let dry.
  • Add white dots (from what is poured in the pallet), using your dotting tool.
  • Let dry. It's probably best to do this nail art over a couple of days.
  • Take black nail art polish and make black bows. (Practice on paper towel if needed). I made triangles connected in the center. They're not perfect but I'm no artist.
  • Let dry completely over night.
  • Add sliver dots with either brush or dotting tool in the center of each bow.
  • Let dry completely. If you rush it, it will smear.
  • Apply fast drying top coat.
  • Glue to fingernails per directions on box.

Drugstore nail glue Pt2: Failure & Success at the Happiest Place On Earth

In Ought9, my family took a trip to Florida and the Happiest Place On Earth. I had been wearing glue on nails, because I wanted my hands to look nice in the pictures. Up until last week, I've been a chronic nail biter.

There have been only 4x in my life I've stopped biting my nails.
  • When I was graduating from high school (1 million years ago)
  • When I got married at 20
  • When I was pregnant with my first baby
  • During a long span of about 2-3 years during the late 90's.
Back to the Happiest Place On Earth...
Unfortunately, and through no fault of our own, we traveled to Florida in May of 2009,  during their most wicked rains ever. It rained EVERY SINGLE DAY for hours. And this was not a light drizzle and done. It was heavy, hard rain. We donned ponchos and slogged through but it was R O U G H.

So there I am, during the first day, standing in front of the Iconic Castle. My french manicure looking lovely in the pictures, but behind us, there are very dark clouds foreshadowing our soggy week to come.

I used brush on glue.  The nail glue did not hold up. By the third day, I was pulling off the nails because of all the water behind them. I was still learning about drugstore glue on nails, and wasn't really prepared for catastrophic nail failure.  I had a tube of the pink glue with me, but once the nails come off re-gluing looks really bad with the french tips. I had not brought any more nails with me. We didn't have a car, so I was stuck with ugly, chewed nails for the rest of the trip.

Fast forward to January 2011...

By then, I'd been wearing glue-on nails for quite awhile. I'd gotten into painting blank glue-on nails with polish. Nailene active square nails are the most comfortable for me. They have a flexible base that sits firmly on my flat nail beds. Knowing we were going back to the Happiest Place on Earth, I wanted to do some nail art to represent the cutest girl mouse in the World.


This time I was super prepared! I brought maximum strength glue, a package of Kiss nails that are pre-polished red, and 10 Broadway nails in Zebra print french tips because I wasn't sure the nails pictured would last the whole 8 days we would be without a car in Florida.

We had normal weather, well, except it was cold some days, but no torrential rains. These nails hung on all week! I did pop off one of the thumbs during check-in (but I always have trouble with thumbs staying put). I glued that back on after filing off the dried glue on my nail, and never had a problem with it again.

Drugstore nail glue Pt1: Things I've learned along the way

Many boxes of glue on nails come with little tubes of pink nail glue. When I first started wearing glue on nails, the only ones I could find were the french tips. They look lovely in the box, but on my fingers, I've got air bubbles.  It wasn't until near the end of 2010 that I figured out I have flat nail beds. Most of the glue on nails are more arched, unless it states on the box for "flat nails." (On a whim, and a really good sale I purchased Nailene's flat nails. They changed my life! They fit like a glove on my fingertips and I had virtually no air bubbles.)

I went on a quest to find better glue that would eliminate the air bubbles under the nails.

I thought I found the solution when I discovered brush on glue. Not only was it easier to use, (I didn't glue my fingers together) but it really helped to reduce the appearance of air bubbles. 

But there is always a gray lining, isn't there? And literally, gray clouds wrecked my  nail glue ideal.

More on that later.

My favorite tube glue is the pink gel glue that comes in Kiss Everlasting French Salon UV Gel Effect nail kit. It seemed to eliminate the air bubbles the most. After that, I like the nail glue that comes in the packages of nail blanks, those glue on nails that can be polished. That glue is longest lasting stuff.

When I want to wear nails for one day, I'll use the sticky tabs. They don't hold up in water but are great if I want to reuse the nails another time, because they peel off my fingernails and off the nails without damaging them.  Then when I want to wear a set of nails for 2-3 days, I'll use the brush-on glue. But I suggest gentle use of the hands with brush-on glue.  Nails can get knocked off very easily.

If I want to wear nails for a full week, that I've polished, I'll go with Kiss or Nailene's maximum strength nail glue that comes in a bottle with a red cap.

Thursday, April 14, 2011

First Post


These Broadway real short press-on nails were my first foray in the drugstore, glue-on nail world. They looked so much nicer than my chewed real nails. I wanted something nice for my wedding anniversary, back in September of 2008.

Since then, I've become obsessed with the many different and affordable styles of press-on nails. My daughter's sick of hearing about them. She told me to get a blog. Ha!

Do you wear artificial nails too? 
Related Posts Plugin for WordPress, Blogger...