I went to CVS earlier today. And wanted to share with you all what I found.
....And I wanted to break the cardinal rule of blogging by posted multiple times in one day!
Anyway, does it count as 2 blog posts on one day if one of them is a vlog?
Tuesday, August 30, 2011
Confetti Crimson Cutie
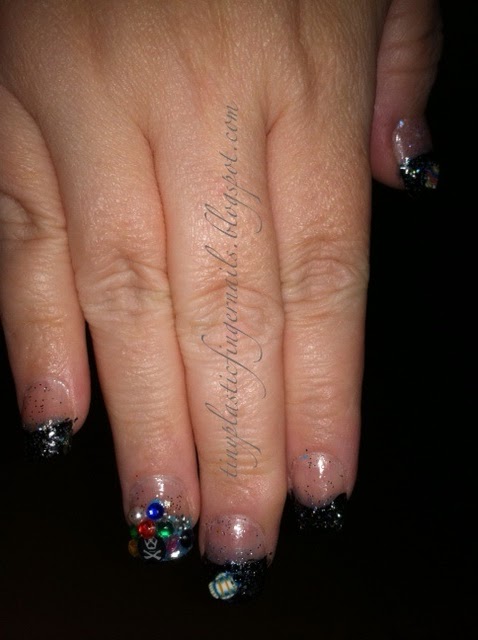
Late, really late last night, I decided to do my nails.
I started by removing the polish and Tasmanian Devil glitter I had on my nails. The glitter left a few pieces that came off easily when I used my nail. I scrubbed my hands with H20 Spa hand and cuticle scrub.
 After the base coat (I'm trying to get my nails to grow. This is the second application of Continuous Growth) I applied a layer of essie ridge filler.
 I absolutely love this stuff. My nails have gullies, and ridges. This stuff fills in them in and makes a smooth base for the nail color. Even the deep gully on my left thumb is less with essie ridge filler.
 I started with two coats of Confetti Crimson Cutie, one of the polishes I picked up in Costa Mesa. It's red with a pink cast to it.
 Well, I liked the results. However, when I went into my craft room to get my Barielle quick drying top coat, I saw Sinful Colors All About You, and thought, hey, maybe that would be nice on top. All About You is a gold glittery polish with some red flecks mixed in.
 So I brushed it about 2/3rds down my nails. The gold is a little lighter on my right hand because I thinned the brush out more. I don't know. I think it's just enough blingy interest.
I started by removing the polish and Tasmanian Devil glitter I had on my nails. The glitter left a few pieces that came off easily when I used my nail. I scrubbed my hands with H20 Spa hand and cuticle scrub.
I applied Sally Hansen Continuous Growth to my nails. And watched a youtube video while it dried. (That's one of my problems. Impatient and won't let the layers dry thoroughly)


I can't just leave well enough alone. ;p
Monday, August 29, 2011
Margarita Senorita
While on vacation last week, I took off my artificial nails. I had been wearing them for a week, had been in the sun, intense heat (113º!), and the ocean. They stayed on but popped off with the tiniest effort.
I didn't have any acetone with me so I buffed off the little bit of glue left on my nails with a file. I polished my nails with 2 coats of Confetti's Margarita Senorita.
 I'm sure I could have used three coats, but I was impatient and didn't want to wait any more for the layers to dry.
Over this I added Tasmanian Devil a multi-colored glitter by Confetti. It's a clear glitter.
 This glitter has so many colors with small and large glitter pieces. It is a pretty good dupe for Debbie Lippman's Happy Birthday glitter, according to Nouveau Cheap.
I wasn't sure I'd like this color when I saw it on other blogs. But when I saw it in CVS I knew I'd like it. It's a fun color!
I didn't have any acetone with me so I buffed off the little bit of glue left on my nails with a file. I polished my nails with 2 coats of Confetti's Margarita Senorita.

Over this I added Tasmanian Devil a multi-colored glitter by Confetti. It's a clear glitter.

I wasn't sure I'd like this color when I saw it on other blogs. But when I saw it in CVS I knew I'd like it. It's a fun color!
Sunday, August 28, 2011
Junk Travel Journal to California and Back and 100th Post!
Wow! Can't believe I've submitted 100 posts already!
For my 100th post, I've got a smilebox slide show of my Junk Travel Journal. From August 18-26, my family took a road trip from Albuquerque NM to Costa Mesa CA. I decided I wanted to make a cheap travel journal, as it was my first that I made, not bought.
I took a brown paper bag, the one that Office Max had put in my Sunday paper, cut it up, and used those pages for my Junk Journal. I spent a dollar and bought a gift bag to use as the cover. Most everything I put in there was found along the way...from rest stops to restaurants.
Having the journal was a fun way to record our trip. It kept me busy too, while my husband looked for geocaches. :D
Have you made a junk journal?
If you'd like to see the before pics of this journal click on this link to my other blog.
For my 100th post, I've got a smilebox slide show of my Junk Travel Journal. From August 18-26, my family took a road trip from Albuquerque NM to Costa Mesa CA. I decided I wanted to make a cheap travel journal, as it was my first that I made, not bought.
I took a brown paper bag, the one that Office Max had put in my Sunday paper, cut it up, and used those pages for my Junk Journal. I spent a dollar and bought a gift bag to use as the cover. Most everything I put in there was found along the way...from rest stops to restaurants.
Having the journal was a fun way to record our trip. It kept me busy too, while my husband looked for geocaches. :D
Have you made a junk journal?
 |
| This free photo slideshow generated with Smilebox |
If you'd like to see the before pics of this journal click on this link to my other blog.
Saturday, August 27, 2011
Back from vacation!
I just got back last night from my vacation trip to California. We drove 700+ miles there and back. It was a long trip, and I'm exhausted. But I wanted to share some of the finds I bought there.
The following is my first youtube video. Hope you like it! (Please forgive my tired voice)
Later on this week, I'll post some swatches and reviews.
Enjoy!
The following is my first youtube video. Hope you like it! (Please forgive my tired voice)
Later on this week, I'll post some swatches and reviews.
Enjoy!
Wednesday, August 24, 2011
Daisy French Tips
(This post was scheduled while I am away)
A little while ago, I posted my Robyn Moses inspired Daisies nail art. I really loved how they turned out, but those nails are medium length, and sometimes, I have trouble doing things with such long nails. I wanted to see how the daisies would look on real short length nails as a french tip manicure.

Nails:

Tools:

Polishes:
 |
| Confetti Silver Slippers, Sally Hansen Lavender Cloud, China Glaze Swing Baby, Wet n Wild The Wonder Yellows, Kiss Nail Art Paint White, Piggy Polish Mystic |
China Glaze:

- With Lavender Cloud, I filled in the curves on the french tips.
- After that dried I painted 2 coats of Jitterbug
- Once that was dry, I painted the daisies with Lavender Cloud.
- While the daisies were drying, I added the centers with Swing Baby, using the larger dotter.
- I went over the tips of the daisies with the white nail paint, using the small brush.
- With the smaller dotter I dabbed The Wonder Yellows over the Swing Baby.
- When everything was dry, top coat each nail entirely.


This was another one that was hard to photograph.
I really liked how they turned out.
(And I wore them *click here*)
(And I wore them *click here*)
What are your impressions of this nail art?
 Update: Here is a pic of me wearing the nails.

Saturday, August 20, 2011
Gold Finger Review

(This review was scheduled while I'm away)
Have you heard of this brand of glue on nails?
I ordered some of these decorated full cover nails from Beauty Online Supply last year. From what I understand, Kiss owns this company. BOS sells Kiss, Broadway and Gold Finger glue on nails. Their prices are the lowest I've seen too.
These nails are long in length.
 |
| Nail sized for index fingernail |
Here I've got a Kiss nail in short length next to the Gold Finger for comparison.
These nails have a curve to them.

When I got these, and saw how long they were, and with the curve, I had to do something to them to be able to wear them.
These pictures were taken last year with my old phone. The quality's not the best.

I cut down the cuticle edge and free edge at the tip, but they were still quite long on me.


The nail design is really pretty. And I'm sure there are women who want these long length nails with a curve, but they are not for me.
Have you tried Gold Finger full cover nails?
Thursday, August 18, 2011
Sunshine and Fruit
I'm going to be away from Blogger for a few days. I've got some posts lined up for while I'm gone. In the mean time, I wanted to show you the nails I'm wearing...


Here's the blog post where I put it all together.
I really love how they turned out!


Take care and see you all again soon!
Saturday, August 13, 2011
Something's Fishy at Night
I have to say, Dee from Deez Nailz inspired this. She's done many manis on one set of nails this week. That got me thinking. What could I do with this nail art to change it up?


I decided to take off the blue, as much as I could around the fish, and turn it into this...

Polishes:

LA Colors (no name) thick Silver Glitter, and Black Velvet, Color Zone (no name) blue glitter, Kiss Nail Art Paint Purple, Cover Girl Ruby Dust, Kiss Nail Art Paint Black
- After removing as much as the blue as possible, I outlined the fish in purple nail art paint, covering the blue around them.
- Then I took the black nail art paint and outlined the bottom of the french tip, filling it in with the Black Velvet.
- On the nail beds I painted on coat of Ruby Dust.
- From the french tip bottom to the middle I painted one coat of blue glitter.
- From the middle to the tip, I painted the silver glitter.
- After all dried, I applied top coat.
- I did have to add a rhinestone over one stubborn blue dot on the pirate booty ring finger.
I like how the fish really stands out now.
Hope you all are having a great weekend!
Thursday, August 11, 2011
Something's Fishy
I have to get my eyes checked on today. My glasses just aren't cutting it for me any longer. I can't wait to go back and look at my nail designs, to see what they really look like. Ha-Ha! I may have to stop blogging after that!
Even though I'm still blurry eyed, I came up with this design...


Argh, Matey!
Even though I'm still blurry eyed, I came up with this design...

Natural Light

With Flash
I used these nails.

I've been able to use all the nails in these box by combining nails for several manis. I trimmed the sides and bottoms of the largest nails to fit my thumbs so none of the nails will go to waste.
Polishes:

Sally Hansen HD BLU & Pixel Pretty, Sinful Colors Opal Glitter, Sally Hansen Lavender Cloud,
Kiss Nail Art Paint Soft Blue
Kiss Nail Art Paint Soft Blue
- I painted the french tips, filling in the curve with Lavender Cloud
- Sponged on 2 coats of Pixel Pretty
- Sponged on 2 coats of BLU
- Brushed Pixel Pretty down the french tip sides, and free edge. Let dry.
- Brushed one coat of Opal Glitter over the blues.
- Added the fish.
- Dotted the Soft Blue paint with a dotter.
- Clear top coat to finish.

On one ring finger nail I added a pirate fimo and pirate booty.

Can you see the Black Pearl?

Argh, Matey!
Wednesday, August 10, 2011
Purple Faux Plaid
I've seen so many bloggers showing purple nail polish shades and manis lately, it got into my subconscious.


After this, I went to bed but couldn't sleep. I just felt that the nails weren't "done" and I needed to add something more.
With Lavender Cloud, I added white dots. Then with My Favorite Martian, I added green dots. It's a sheer color, so I had to go over the dots a couple times.


Here's the mani I came up with...

Nails:
Polishes:
 | ||
| Confetti Purple Pizzazz, My Favorite Martian, Belle of the Ball, Centerstage, Sally Hansen HD DVD, Sally Hansen Diamond Strength Deeply Violet, Kiss Nail Art Paint Gold, Sally Hansen Lavender Cloud |
- Painted the french tips with Lavender Cloud, filling in the moon. Let it dry.
- With a cosmetic wedge I sponged on Belle of the Ball, let dry.
- Sponged on Centerstage, and then Purple Pizzazz.
- Polished one coat of DVD over the purple sponged areas.
- With the Kiss Gold nail paint, I added a line under the bottom of the french tips.
- With my nail dotter I made gold flowers on the thumbs. With Deeply Violet, I dotted down each nail and defined the flowers.

After this, I went to bed but couldn't sleep. I just felt that the nails weren't "done" and I needed to add something more.
With Lavender Cloud, I added white dots. Then with My Favorite Martian, I added green dots. It's a sheer color, so I had to go over the dots a couple times.


Natural Light

With flash
This mani was really difficult to photograph. I guess because it's so shiny?
If you click on the pictures, you'll be able to see the details better.
I'm going to save these to wear this fall. It just seems like a good autumn mani.
What do you think?
Tuesday, August 9, 2011
Daisies

This mani was inspired by Robyn Moses' Daisy Wall Paper.
Most of the time, I am terribly intimidated by and in awe of Robyn's artistic abilities. But I continue to watch her videos, because she's inspiring. On Monday of this week, she put up a you tube video titled: Daisy Wall Paper.
I wanted to try it, but I was apprehensive. I dug around in my gift bag of nail stickers and found these...


These daisy stickers are really cute, and would have worked fine. I just felt I needed to try to paint the daisies instead.
Polishes:
Confetti Silver Slippers, Sally Hansen Lavender Cloud, China Glaze Swing Baby, Wet n Wild The Wonder Yellows, Kiss Nail Art Paint White, Piggy Polish Mystic
Tools:
Two sizes of dotters, and thin tip brush

- Painted Kiss Oval Active Length full cover nails with 2 coats of Silver Slippers.
- With the small tip brush, I painted all the daisy petals with Lavender Cloud. Let dry.
- In the daisies' centers I used the bigger dotter with the Swing Baby. Let dry.
- With the White nail art paint, and using the small tip brush, I went over the daisies' petals at the ends. Robyn said this would make them more 3-D.
- On the Swing Baby, using the smaller dotter, I dabbed on The Wonder Yellows.
- Once that dried, I used the smaller dotter again, and dabbed on Mystic in the daisies' centers, over The Wonder Yellows.

Without flash

With flash

Of course, Robyn uses paints and brushes and is a true artist. I think though, I was able to come up with a reasonable reproduction with the nail polishes and tools I used.
What do you think of my Daisies?
Subscribe to:
Posts (Atom)