Welcome!

Welcome! So glad you stopped by my little bit of blogdom. Here I share my hobbies of nail polish, nail art and glue-on nails.


Showing posts with label Kiss Everlasting Nails. Show all posts

Thursday, October 13, 2011

Kiss Everlasting French Petites Review

I have short nail beds, which makes wearing "real short, short, and medium" french tip nails difficult.

I found these at Ulta a few months back. 


That was the only place I saw them until recently. I've seen them at Target and CVS last month.

It comes with glue, (that was dried up), a cuticle stick and nail file.

I sized up the nails as best I could. My left hand seems to be more "petite" than my right hand.
The pinky nail on my left hand is the size I normally use but in the petite it's too short and doesn't go past my finger like the other nails.


My middle and ring finger on my right hand don't seem to fit as well as the others. I used the same size nails as I normally do for other lengths but they don't seem to be big enough for these 2 fingers.


About an hour after I glued on the middle and ring fingernails, I see that they didn't hold completely at the cuticles' edges.


Pros: 
Length--they are a really comfortable length for me to wear. I can type easily.
Appearance--At a glance they look natural on my hands.

Cons:
One nail fits my nail bed but does not extend a little past my finger like the other nails.  The length is too short.
Not enough medium sizes numbers to fit my right hand properly.


Conclusion:
I won't be buying these again. I think I'm better off buying larger/longer lengths and cutting them down so I have a proper fit width-wise across my nails. 

Have you tried these petite sizes?

Thursday, October 6, 2011

Fall Floral Mani

Fall is here!

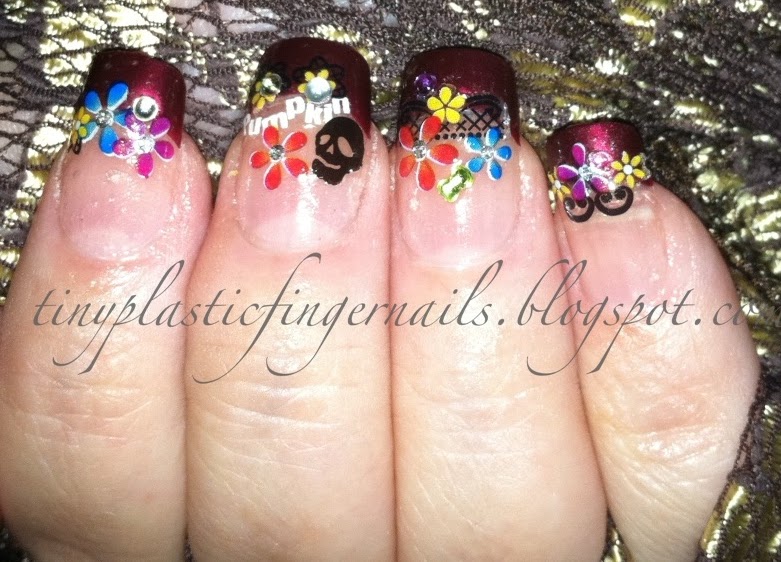
Kiss Floral stickers and Kiss Halloween stickers.

I wanted to do a mani to reflect the autumnal season on my nails.

I started with Kiss Everlasting French Tip Medium Length Nails 
with Burgundy Tips:

Then I added Kiss Floral and Halloween stickers.

Here's my little pumpkin on my right thumb!


On my right hand, I added the word sticker "Pumpkin".

On my left hand is a gold skull and the "skull" word sticker.

On each finger I've added little rhinestones to enhance this look.

I've used 2 or 3 coats of clear polish over each nail so the stickers stay put.


I hope you like my fall floral design!

Thanks for stopping by!

Tuesday, October 4, 2011

Real Short Nails Storage

I've been working on packing to move. One day, I put all the boxes of my Kiss Everlasting French Real Short Length Nails together, and found I had this many:
Some are not completely filled but still, that's a lot of nails. I've been buying these for months, mostly every time there is a sale or I have a coupon.

A little bit about our move...
We're planning on fitting everything we are moving into one of these cubes. They aren't very big. We're selling most of our furnishings, and putting everything else into boxes and into this cube.

Well, we don't know when we'll see this cube again. It might go into storage for a couple of months. Or we might have it delivered shortly after we move. We just don't know yet.

I'm not packing my glue on nails or polishes. Those are coming with me in the car. It's a small car, and we laugh about how much stuff we want to take in the car. How it's going to be piled on top of our laps as we ride across the California desert.

With that in mind, I'm doing my best to consolidate what I have into something more manageable than what I have now.

After using up most of the nails in this Kiss 100 nail blanks package, I consolidated what remained into a new container, and kept this because I knew it would be used for something. Fimo, rhinestones, or other nails. I just didn't know.

Until now...
I sorted all the nails in all the French Tip Everlasting boxes into the empty container.

On the top row are 12's that fit on my left pinky (there were too many to fit in the end section) Left hand: thumbs, index, middle, ring, pinky nails.

Bottom row: Size 0's that can be cut down to fit either thumb nails. Right hand: Thumbs, index, middle, ring, and pinky.

I cut the top off one of the boxes to divide the pinkies from the thumb nails. And so I'd have the package number and nail length for reference.

So now, instead of having 8 boxes to carry with me, I have one, saving space and room in my little car.

This is what I ended up with, from the boxes:
I had used some of the nail files, cuticle sticks and glue from the packages already.

What do you think?
How would you move your polish collection if you had to?
What kind of container would you use?
Any tips?
Let me know in the comments below...

Monday, September 26, 2011

Kiss Everlasting French Tip Nails in Medium Length


Sometimes, a girl just wants some glam on her nails.

Walgreens recently had their Kiss products Buy One Get Half Off and I decided to try out the medium length. The number is 54249.

Now I love Kiss Everlasting French Tip in real short length. The number is 54248. These are the ones that have the salon uv gel effect base. I'll do a comparison in another post.

What I want to talk about today is the medium length with the same salon uv gel effect base.


 These were very easy to apply with the pink gel glue provided.
Yes, I know these don't fit me. You can see my real nail's edge under the glue on nail. But I really loved the length and had in mind to use stickers to cover the gap.


I layered stickers from 2 different Kiss Nail Artist Sickers packages.


 One of the sticker sheets has floral designs of varying sizes. Each floral center has a different gem color: blue, yellow, pink, orange, green, red. On each nail I used a different gem color.

Here's a close up of the stickers:


 I polished them with clear nail polish. Whenever I felt a little raise from a sticker's edge, I would just put on another clear coat of polish.

 I'm really pleased with how these turned out!

(PS: I'll have a vlog sometime this week. I woke up with allergies active and I sound like I have a cold.)

Saturday, September 17, 2011

7th Wedding Anniversary Nail Art


Ok, so I couldn't get to sleep the other night. Enter iPhone. I never thought I'd use my phone so much but that was before my husband got me this mini-computer. It's actually faster than my 4 year old macbook.

Anyway, I was looking up symbols/gifts/colors for the 7th wedding anniversary since mine is... today!

7th Wedding Anniversary Symbols


Traditional: Copper/Wool
Modern: Desk Sets
Flower: Jack-in-the-Pulpit
Gemstone: Onyx/Yellow Sapphire
/Golden Beryl
 

7th Anniversary Color:

Yellow or off white 


Well, I was stumped on what to do for a special nail art, but not for long. 

I decided on grey for the wool, and off white for the complementary color.

The other day, I bought some Milani (BOGO 1/2 off) at CVS.  One of the polishes is Charmed. It's a black glitter polish.
Polishes:
Milani Charmed, Confetti I<3 U, China Glaze Jitterbug


Charmed is a gorgeous black with silver glitter. I <3 U is a very pretty pearl, and Jitterbug is a striking silvery-grey.

I wasn't sure how elaborate I was going to get with the nail art and enhancements, plus I wanted a little more length on my nails than where my natural nails are right now.  So I reached for these:


I knew I wanted french tips and these are my favorite.

I used the lace from this sticker package.


The half pearls from this package.


 And white flowers from this.


I first lined up my nails and painted pearl slants with I <3 U. It took 3-5 coats to get to opacity. (I added 2 more coats after I had painted Jitterbug)
Without flash

with flash

2 coats of Jitterbug here. Then one coat of Charmed.

Once everything was dry, I added the flower and lace stickers along the I <3 U edge and pearls to the grey area on the thumbs and ring fingers. I went back later and put clear top coat over the entire nail.

I added a line of black with Kiss Nail Art paint to define the grey area better.

I was going for grey wool jackets over silk and lacey blouses.


I have to say, I haven't felt this good about my nails since before I went on vacation. I know my natural nails are growing and are mostly healthy. But I missed having them all the same length and shape.

I wanted to show you a close up of my thumbnail. I used 2 over sized nails for my thumbnails because I didn't want to waste them. I cut them down on the sides and across the cuticle edge with regular scissors and rounded the square sides on the tips. Cutting larger nails down worked better for my flatbed thumbnails with horizontal cuticles. The nails, because they were bigger, are less curved, and lie flat against my natural nail.

And here are closeups of each nail.

 The floral/lacey sticker is different on each nail on both hands, but identical to the finger's opposite.

We're going on the aerial tram today and eating lunch on top of the mountain. 
Something we did for our first wedding anniversary.

Friday, September 9, 2011

Sometimes grocery shopping isn't all drudgery

I had to make a trip to the grocery store. I chose Albertsons because I wanted to get some expiration day or day old bread. I walked out of there with $85 worth of food and sundries, and fresh French bread for .99¢ with their store coupon. Amazing what one short trip to the store turns into.

One of the things I like to do when I get to Albertsons is go to their cosmetics department first thing and see what's on sale.  Today I hit a .59¢ Wet n Wild Wild Shine polish deal, and 40% off Kiss nails products.

I made a video to share with you all what I bought.

Wednesday, August 24, 2011

Daisy French Tips

 (This post was scheduled while I am away)

A little while ago, I posted my Robyn Moses inspired Daisies nail art. I really loved how they turned out, but those nails are medium length, and sometimes, I have trouble doing things with such long nails. I wanted to see how the daisies would look on real short length nails as a french tip manicure.


Nails:

Tools:

Polishes:
Confetti Silver Slippers, Sally Hansen Lavender Cloud, China Glaze Swing Baby, Wet n Wild The Wonder Yellows, Kiss Nail Art Paint White, Piggy Polish Mystic

I used the same techniques and polishes as before with one change. I subbed China Glaze Jitterbug for the the Confetti Silver Slippers.
China Glaze:

  • With Lavender Cloud, I filled in the curves on the french tips.
  • After that dried I painted 2 coats of Jitterbug
  • Once that was dry, I painted the daisies with Lavender Cloud.
  • While the daisies were drying, I added the centers with Swing Baby, using the larger dotter.
  • I went over the tips of the daisies with the white nail paint, using the small brush.
  • With the smaller dotter I dabbed The Wonder Yellows over the Swing Baby.
  • When everything was dry, top coat each nail entirely.
This was another one that was hard to photograph.

I really liked how they turned out.
(And I wore them *click here*)

What are your impressions of this nail art?

Update: Here is a pic of me wearing the nails.

Thursday, August 11, 2011

Something's Fishy

I have to get my eyes checked on today. My glasses just aren't cutting it for me any longer. I can't wait to go back and look at my nail designs, to see what they really look like. Ha-Ha!  I may have to stop blogging after that!

Even though I'm still blurry eyed, I came up with this design...
Natural Light
With Flash

I used these nails.
I've been able to use all the nails in these box by combining nails for several manis. I trimmed the sides and bottoms of the largest nails to fit my thumbs so none of the nails will go to waste.

Polishes:
 Sally Hansen HD BLU & Pixel Pretty, Sinful Colors Opal Glitter, Sally Hansen Lavender Cloud,
Kiss Nail Art Paint Soft Blue

  • I painted the french tips, filling in the curve with Lavender Cloud
  • Sponged on 2 coats of Pixel Pretty
  • Sponged on 2 coats of BLU
  • Brushed Pixel Pretty down the french tip sides, and free edge. Let dry.
  • Brushed one coat of Opal Glitter over the blues.
  • Added the fish.
  • Dotted the Soft Blue paint with a dotter.
  • Clear top coat to finish.
On one ring finger nail I added a pirate fimo and pirate booty.


Can you see the Black Pearl?


Argh, Matey!
Related Posts Plugin for WordPress, Blogger...